Batch Export of Diagrams
Each good diagram tool should offer to export diagrams to standard image formats. Software Ideas Modeler is no exception. It allows you to save the diagrams to various bitmap and vector formats. If you want to export one or two diagrams from a project, you may just open them and export them one by one. If you need to export more diagrams, there is a better option – Batch Export.
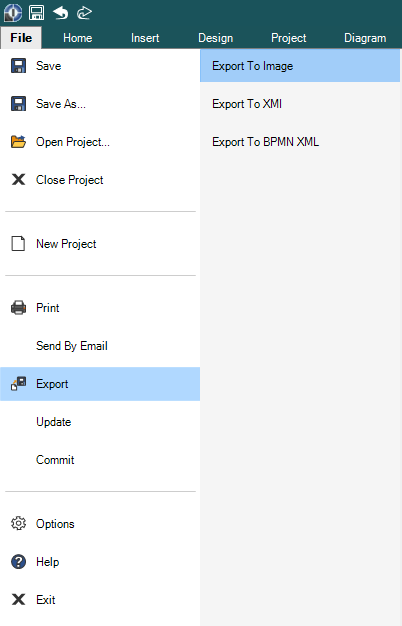
It can export multiple diagrams to images. The Batch Export dialog is accessible from the ribbon menu File/Export/Export to Image. The equivalent for the classic menu is File/Export/Image.

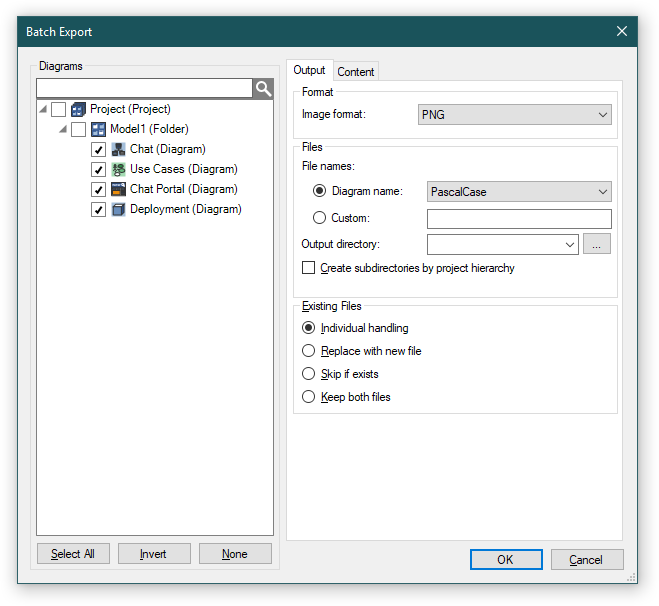
Batch Export dialog offers several options on how to set the export. Firstly, you should choose which diagrams you want to export. It may be done in the tree view on the left. There are four associated buttons:
- Select All – selects all the diagrams in the project
- Invert – inverts the current selection of diagrams
- None – deselect all selected diagrams
On the right, there is a tab control with two tabs Output and Content.
Output
In the Output tab, you may choose the format which will be used for the exported images (bitmap formats: PNG, JPG, GIF, BMP, TIFF, vector formats: SVG, WMF, EMF and PDF document with an image of the diagram).

The most settings may stay unchanged, but the only necessary thing you need to specify is the output directory where the exported images will be saved.
The exported diagrams do not need to be in one folder, they may be organized in a hierarchy of folders which copies the project internal structure. If you want to export the diagrams to the hierarchy, check the box below the output directory field - Create subdirectories by project hierarchy. If it is unchecked, the hierarchy will be flattened.
Exported Diagram File Naming
The files with exported diagrams must be named somehow. The batch export offers various rules on how to name the output files. There are two main ways:
1. One way is to choose the diagram name or its slight modification for the filename:
| Setting | Result |
|---|---|
| Original | Example Class Diagram |
| LowerCase | example class diagram |
| UpperCase | EXAMPLE CLASS DIAGRAM |
| CamelCase | exampleClassDiagram |
| PascalCase | ExampleClassDiagram |
| Underscored | Example_class_diagram |
| Hyphened | Example-class-diagram |
2. Another way is to define a custom rule for file naming. The default rule is as follows: <ModelName>_Diagram<Index>_<DiagramName>
You may modify it as you want using the supported tags. The tags you may use in the custom naming rule are:
| Tag | Meaning |
|---|---|
| <ModelName> | The name of parent model of processed diagram. |
| <Index> | The index of processed diagram in sequence. |
| <DiagramName> | The name of processed diagram. |
| <Uid> | Internal ID of diagram. |
Content
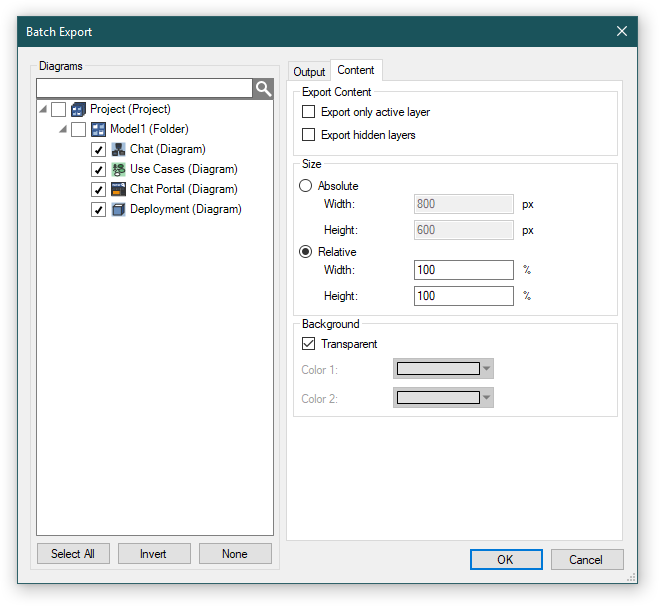
The properties of generated images can be adjusted in the Content tab. It offers the settings for layer handling, the size and background style.

You may adjust the behavior about layer exporting:
- Export Only Active Layer – exports only the active layer for each diagram, other layers will be omitted.
- Export Hidden Layers – exports all layers including hidden layers.
The size may be set as absolute or relative values:
- Absolute size – all exported images will have the same absolute size.
- Relative size – width and height is defined as percentage of the original diagram size.
The background group allows you to choose a transparent background for the exported diagrams (if the chosen image format supports it) or a color gradient.
The export will start after clicking on the OK button. The progress of exporting will be indicated in a window which shows during the export.

Assid 26 May 2014 13:31:47
PDF export
Dusan Rodina - softwareideas.net 26 May 2014 21:27:20
RE: PDF export