Database Reverse Engineering
Database Reverse Engineering supports various database sources – MS SQL, MySQL, and OLE DB (which includes several sources including Oracle database). You can import a complete data model of a selected database or import only some tables. The tool is accessible using the Database button:
- Ribbon: Process tab/Reverse Engineering group/Database button
- Classic Menu: Tools/Reverse Engineering/Database)

Import Database Tables to Project
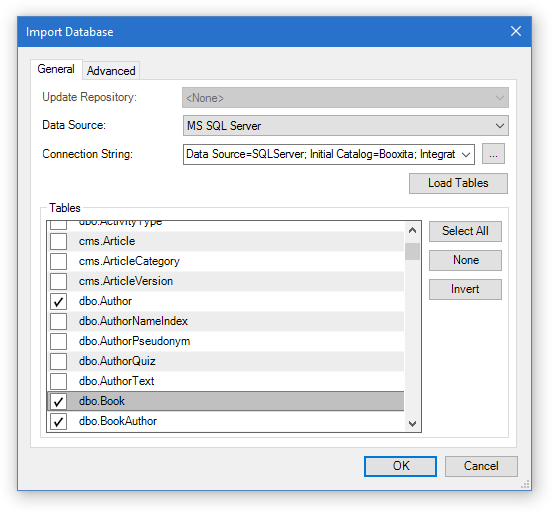
Import Database dialog provides reverse engineering for the database. Firstly, you have to choose the kind of your data source – choose one of the available options from the Data Source combo box (MS SQL Server, MySQL, or OLE DB). Then set the connection string to your database.

Database Selection
For MS SQL Server, you can set the connection string using a dialog Database Selection available after clicking the ellipsis button. In this dialog, you need to fill fields – Server name, Authentication type, User name, Password, and Database name. You confirm the dialog clicking on the OK button and the program will generate a connection string.
After filling the connection string, a list of available tables in the database will be displayed below. You can select all tables using Select All button, clear the selection using None or invert the selection of tables using the Invert button. The selected tables will be imported to the active project.
Advanced Options
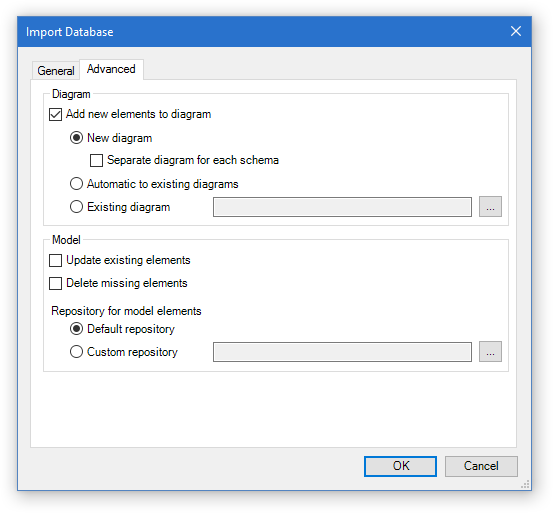
Database Import dialog contains also the Advanced tab, which includes some other settings which affect the imported result. You can choose whether you want to import only the model or you want to create also diagrams. Diagrams are generated by default, you can change it and omit the diagram generation when you uncheck the option Add new elements to diagram. If you decide to let this option check and create diagrams for the imported data model, you have other options about diagram creation:
- New diagram – creates a new diagram for the imported tables, all tables will be in a single diagram.
- Separate diagram for each schema – the option split imported tables to multiple diagrams by their schemas.
- Automatic to existing diagrams – the imported tables will be added to existing diagrams according to their relations with tables already imported in the project.

The model group in the Advanced tab allows you to adjust the way how the model will be updated.
Update existing elements – the tables which are already present in the project will be updated by the current state in the database, which the model is imported from. The new columns will be added, the missing columns will be removed.
Delete missing elements – if some tables are missing the chosen database, they will be deleted also from the model of the current project.
The new elements are imported to the default repository – which is {Project}/Databases/{Database Name}/{SchemaName}. If you do not want to add elements to this repository, you can choose your own one clicking on the ellipsis button on the right of the Custom repository field.
Importing Data Model
After clicking the OK button, selected tables from the database will be imported to the project by the chosen settings. The new elements will be added to the project model, and if the settings allow it, diagrams will be created.
When you click on the Database button now and try to import other tables to the project, the software will ask you whether you want to use the same connection string as the one, which was used at the last import. If you accept it, the Import Database dialog will be switched to update mode, which allows you to easily update the model and apply the changes from the database.

Mattias Gustafsson 22 September 2016 10:44:31
MySQL
Mattias Gustafsson 22 September 2016 12:12:52
RE: MySQL
Dusan Rodina - softwareideas.net 22 September 2016 12:20:59
RE: RE: MySQL
Cosmas 14 December 2023 13:00:23
Mysql